

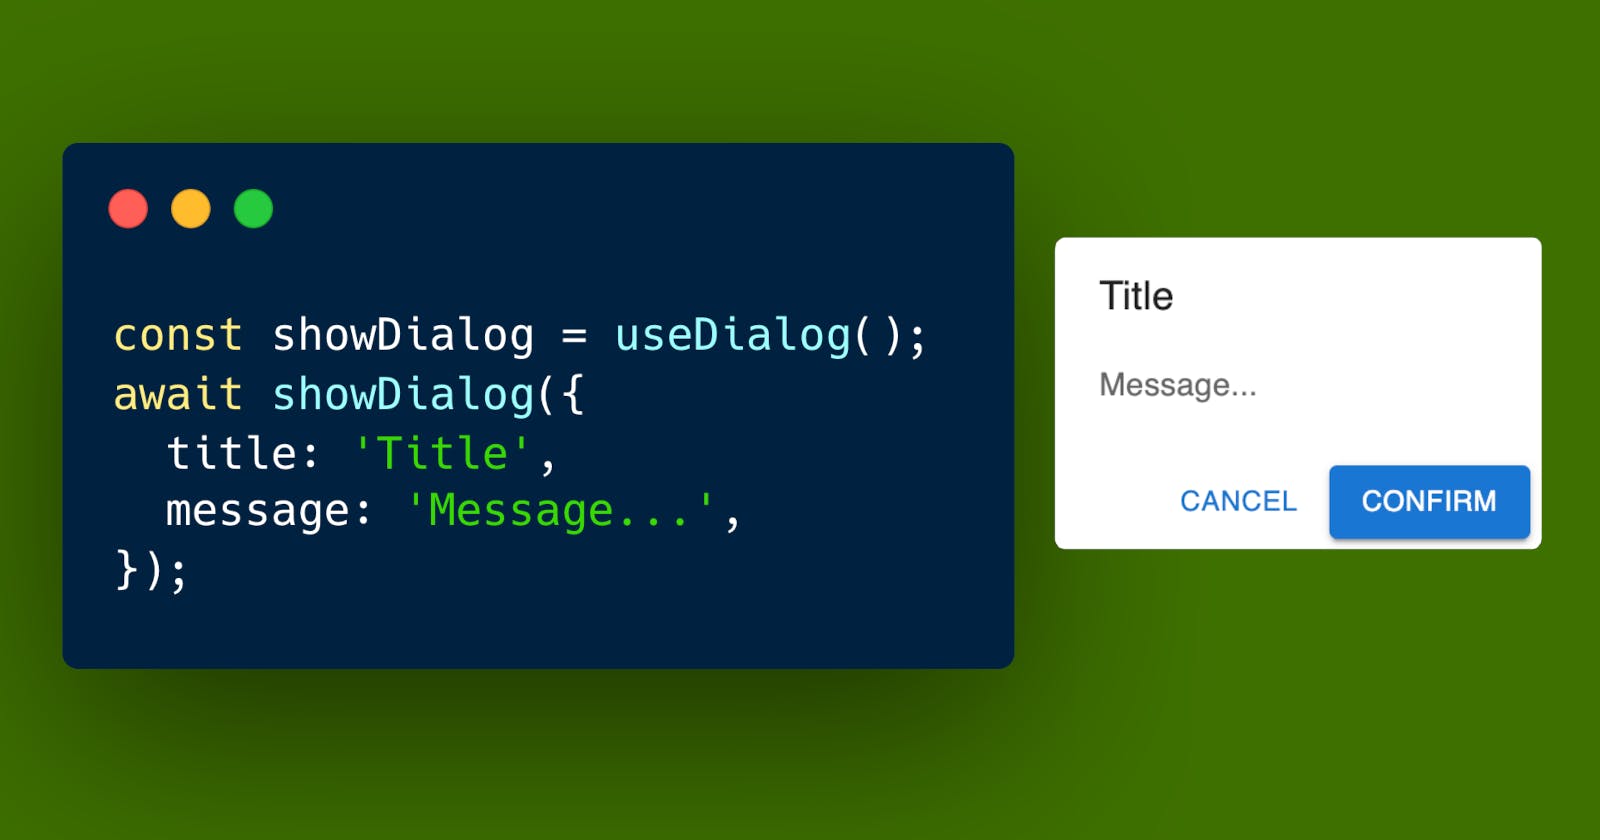
Create an easily callable Modal Dialog or Snackbar Provider in React with Promise and Context


You might have noticed that with many React packages, you have to wrap your app with a Provider component.
The reason for that is that those packages are using Contexts so you can easily access the component's variables and functions from anywhere in the app.
And that's what we are going to be learning to do in this tutorial.
The following image shows how the code would look like with and without the use of a provider:
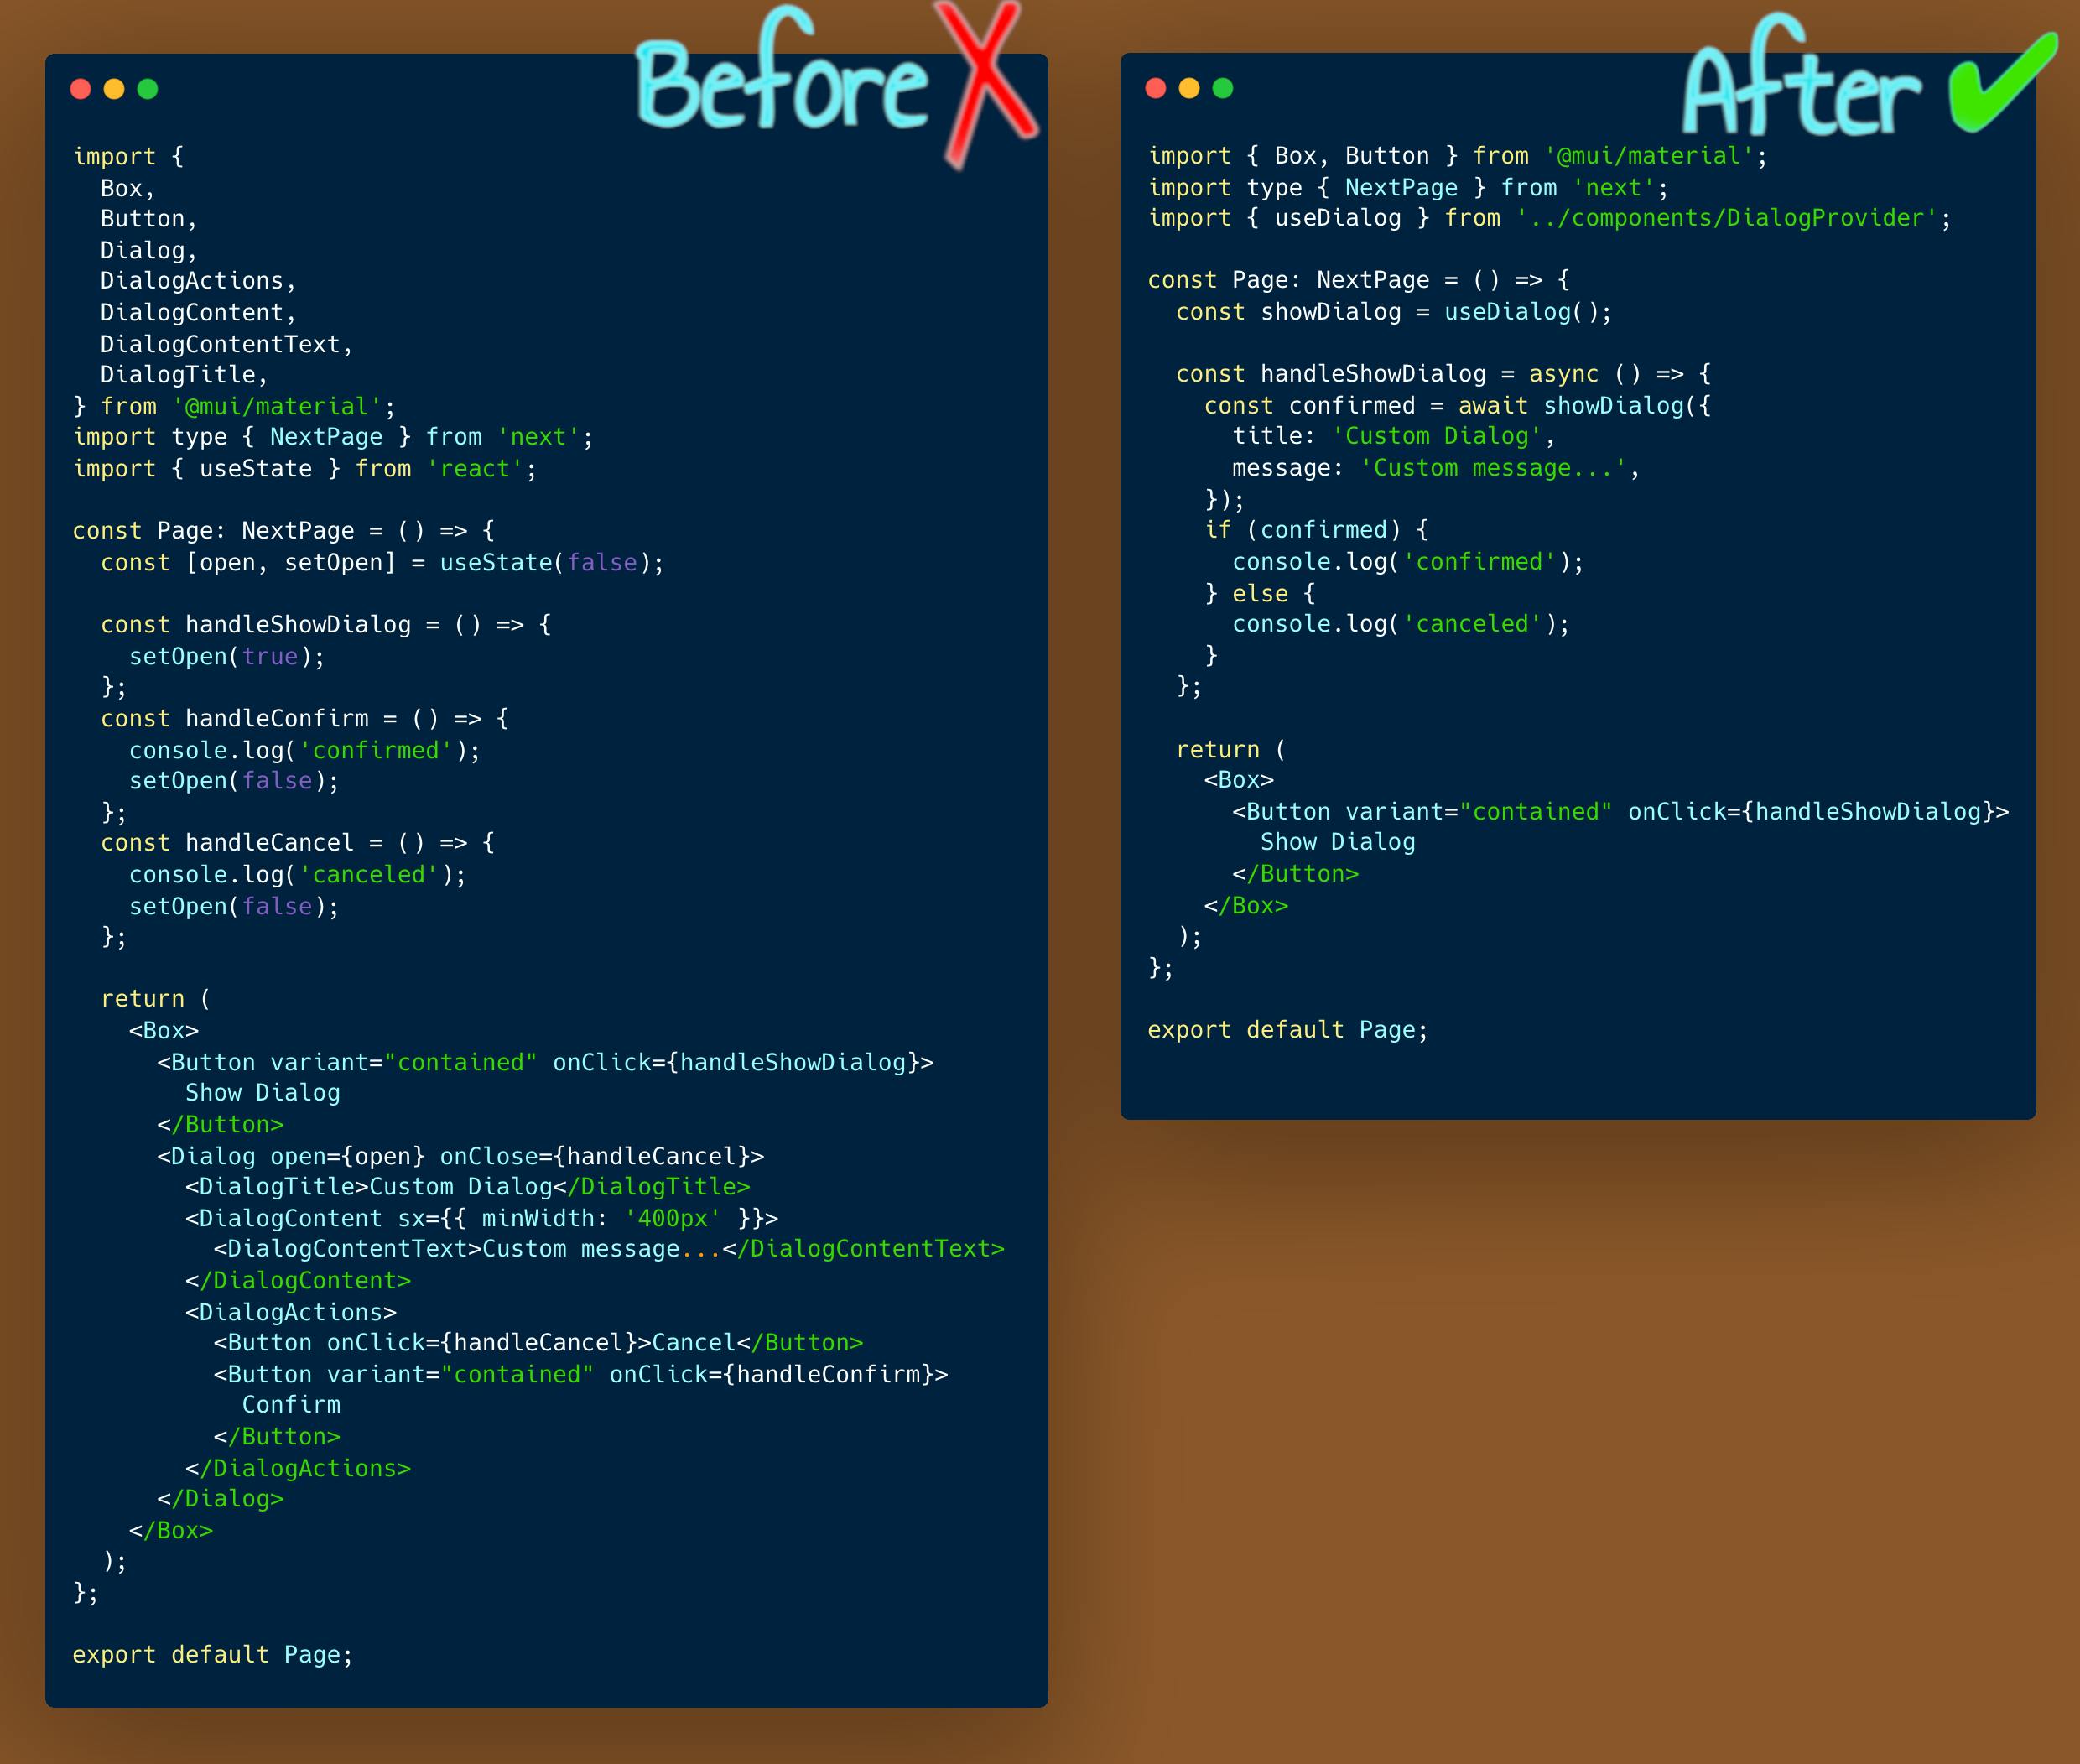
With the provider, you will still need to code the left part in the image. The difference is that you will do it just once, at the base of the application, and will be able to reuse it anywhere you want.
The app structure
I'll be using Next.js and Material UI for this tutorial, but the same concepts can be replicated in a normal React application and with any other component library, or even for custom dialogs built with tailwind.
You can check the final code in the github repo: github.com/perfectbase/dialog-and-snackbar-..
The project was created with the following command:
npx create-next-app@latest --typescript
And the necessary packages for Material UI were installed with this command:
npm i -E @mui/material @emotion/react @emotion/styled
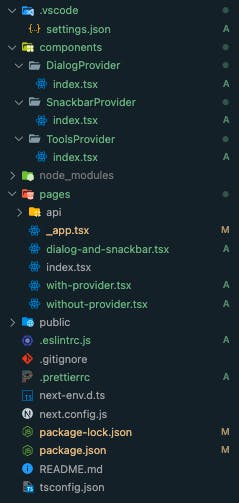
Here is the final folder structure:
The Dialog Provider
First let's take a look on how the final provider code looks like so I can start explaining it.
// components/DialogProvider/index.tsx
import {
  Button,
  Dialog,
  DialogActions,
  DialogContent,
  DialogContentText,
  DialogTitle,
} from '@mui/material';
import { createContext, useContext, useState } from 'react';

interface DialogOptions {
  title: string;
  message?: string;
}

interface PromiseInfo {
  resolve: (value: boolean | PromiseLike<boolean>) => void;
  reject: (reason?: any) => void;
}

type ShowDialogHandler = (options: DialogOptions) => Promise<boolean>;

// Create the context so we can use it in our App
const DialogContext = createContext<ShowDialogHandler>(() => {
  throw new Error('Component is not wrapped with a DialogProvider.');
});

const DialogProvider: React.FC<{ children: React.ReactNode }> = ({
  children,
}) => {
  const [open, setOpen] = useState(false);
  const [options, setOptions] = useState<DialogOptions>({
    title: '',
  });
  const [promiseInfo, setPromiseInfo] = useState<PromiseInfo>();
  const showDialog: ShowDialogHandler = (options) => {
    // When the dialog is shown, keep the promise info so we can resolve later
    return new Promise<boolean>((resolve, reject) => {
      setPromiseInfo({ resolve, reject });
      setOptions(options);
      setOpen(true);
    });
  };
  const handleConfirm = () => {
    // if the Confirm button gets clicked, resolve with `true`
    setOpen(false);
    promiseInfo?.resolve(true);
    setPromiseInfo(undefined);
  };
  const handleCancel = () => {
    // if the dialog gets canceled, resolve with `false`
    setOpen(false);
    promiseInfo?.resolve(false);
    setPromiseInfo(undefined);
  };
  return (
    <>
      <Dialog open={open} onClose={handleCancel}>
        <DialogTitle>{options.title}</DialogTitle>
        <DialogContent sx={{ minWidth: '400px' }}>
          {options.message && (
            <DialogContentText>{options.message}</DialogContentText>
          )}
        </DialogContent>
        <DialogActions>
          <Button onClick={handleCancel}>Cancel</Button>
          <Button variant="contained" onClick={handleConfirm}>
            Confirm
          </Button>
        </DialogActions>
      </Dialog>
      <DialogContext.Provider value={showDialog}>
        {children}
      </DialogContext.Provider>
    </>
  );
};

// By calling `useDialog()` in a component we will be able to use the `showDialog()` function
export const useDialog = () => {
  return useContext(DialogContext);
};

export default DialogProvider;
→We want to be able to await until the user confirms or cancels the dialog.
→For that, we need to return a Promise.
→We want to resolve the Promise only after the user makes an action, so we keep the resolve function in the component's state.
→After the user confirms or cancels the dialog, we resolve with true or false.
Wrapping the app with the provider
Now we need to wrap the app with the provider, so we can call the showDialog() function from anywhere on our app.
// pages/_app.tsx
import type { AppProps } from 'next/app';
import DialogProvider from '../components/DialogProvider';

function MyApp({ Component, pageProps }: AppProps) {
  return (
    <DialogProvider>
      <Component {...pageProps} />
    </DialogProvider>
  );
}

export default MyApp;
Call it from any page or component
We can call it like this:
// ...
  const showDialog = useDialog();

  const handleShowDialog = async () => {
    const confirmed = await showDialog({
      title: 'Custom Dialog',
      message: 'Custom message...',
    });
    if (confirmed) {
      console.log('confirmed');
    } else {
      console.log('canceled');
    }
  };
// ...
You can see that the code awaits until you 'confirm' or 'cancel' the dialog.
This helps you keep your code cleaner and easy to read.
What about a Snackbar?
The same logic can be used to create a Snackbar Provider.
Here is how my code looks like:
// components/SnackbarProvider/index.tsx
import { Alert, Snackbar } from '@mui/material';
import type { AlertColor } from '@mui/material';
import { createContext, useContext, useState } from 'react';

type ShowSnackbarHandler = (message: string, severity: AlertColor) => void;

const SnackbarContext = createContext<ShowSnackbarHandler>(() => {
  console.error('Component is not wrapped with a SnackbarProvider.');
});

const SnackbarProvider: React.FC<{ children: React.ReactNode }> = ({
  children,
}) => {
  const [open, setOpen] = useState(false);
  const [message, setMessage] = useState('');
  const [severity, setSeverity] = useState<AlertColor>('success');
  const handleClose = (
    _event: React.SyntheticEvent | Event,
    reason?: string
  ) => {
    if (reason === 'clickaway') {
      return;
    }
    setOpen(false);
  };
  const showSnackbar: ShowSnackbarHandler = (message, severity) => {
    setMessage(message);
    setSeverity(severity);
    setOpen(true);
  };
  return (
    <>
      <Snackbar
        open={open}
        autoHideDuration={4000}
        onClose={handleClose}
        anchorOrigin={{ vertical: 'top', horizontal: 'center' }}
        sx={{ minWidth: '50vw' }}
      >
        <Alert onClose={handleClose} severity={severity} sx={{ width: '100%' }}>
          {message}
        </Alert>
      </Snackbar>
      <SnackbarContext.Provider value={showSnackbar}>
        {children}
      </SnackbarContext.Provider>
    </>
  );
};

export const useSnackbar = () => {
  return useContext(SnackbarContext);
};

export default SnackbarProvider;
In this case is a little simpler because we are not using Promises here.
You could add the Promise logic if you want your snackbar to have actions.
npm package?
I couldn't find a npm package for this. That's the main reason I decided to make this tutorial.
If people want, I could make a package with a customizable version of both providers. If you think this would be a good idea let me know in the comments or tell me on Twitter.
Conclusion
Learning how to use Contexts in React can open a lot of doors and it will definitely help you create the PerfectBase 😉 structure for your future apps!
Example Code Repository
github.com/perfectbase/dialog-and-snackbar-..
Thanks for reading!
👋 Let's connect!